Dissecting Apple's Sparse Image Format (ASIF)
At WWDC 2025, Apple announced macOS 26 Tahoe. One of the new features in macOS Tahoe is a new disk image format: ASIF. Designed for use with virtual machines (its documentation lives under the Virtualization framework), ASIF takes a lot of inspiration from existing virtual disk formats. Practically, that means it’s another sparse virtual disk format, and functions very similar to sparse VMDK, VHDX or QCOW2 files.
Shortly before the release of macOS Tahoe (late 2025), I thought it’d be a fun exercise to try and write a parser for ASIF files. It’s been a while since then, but I wanted to go back and show my process on how I approach these kinds of problems. Maybe someone unfamiliar with reverse engineering file formats can pick up a thing or two. For that reason, you can find the occasional “Research note” sprinkled throughout this post with some additional insights.
Let’s create a test file with the command listed in the Apple documentation, write a test pattern to it and get started:
❯ diskutil image create blank --fs none --format ASIF --size 1GiB file

file.asif created

❯ diskutil image attach -nomount file.asif
/dev/disk4

❯ python3
Python 3.14.0 (main, Oct  7 2025, 09:34:52) [Clang 17.0.0 (clang-1700.3.19.1)] on darwin
Type "help", "copyright", "credits" or "license" for more information.
>>> fh = open("/dev/disk4", "wb")
>>> for i in range(255):
...     fh.write(bytes([i] * 1024 * 1024))
>>> fh.close()

❯ hdiutil detach disk4
"disk4" ejected.
Eyeball hexdumps
As usual, we start by eyeballing some hexdumps to see if we can discern some details.
❯ xxd file.asif | head -5We can immediately spot some kind of file magic, followed by some big endian looking integers.
Research note
Whenever you’re reverse engineering a file format and you see some magic bytes, it’s always a good idea to search for any available information on it online. I usually search for a combination of the string/byte representation, big endian hex and little endian hex of the file magic in various search engines (Google, GitHub, VirusTotal Retrohunt). In this case, I didn’t find much useful information.
As for “spotting endianness” or integer fields, it’s almost like riding a bicycle after a while. I guess a tip is to scan from left to right in chunks of 4 bytes (
uint32), then 8 bytes (uint64), then possibly dividing into smaller chunks (uint16or evenuint8), until you can parse out reasonable looking integers (round base 16, or cross reference with offsets in the file, optionally multiplied by other values you spot). If you see “natural order” looking integers, it’s big endian. If it looks reverse, it’s little endian.
Let’s quickly type up a rough structure, making a best guess at the integer widths and inspect it further with dissect.cstruct:
# /// script
# requires-python = ">=3.10"
# dependencies = ["dissect.cstruct"]
# ///

import sys

from dissect.cstruct import cstruct, dumpstruct

asif_def = """
struct header {
    char    magic[4];
    uint32  field4;
    uint32  field8;
    uint32  fieldC;
    uint64  field10;
    uint64  field18;
    char    field20[16];
    uint64  field30;
    uint64  field38;
    uint32  field40;
    uint32  field44;
    uint32  field48;
    uint32  field4C;
};
"""
c_asif = cstruct(asif_def, endian=">")

with open(sys.argv[1], "rb") as fh:
    header = c_asif.header(fh)
dumpstruct(header)Some interesting numbers, we can immediately spot two instances of 0x200, a common sector size (512 bytes). After playing around a bit multiplying and dividing different values, we can also figure out that field30 might be the virtual disk size in sector numbers (1GiB // 512 = 0x200000).
If we assume for now that field8 is the sector size, field10 and field18 might be offsets into the file. Let’s look at a slightly larger hexdump:
❯ xxd -a file.asif | head -32Much more revealing. We can spot some data at 0x00000200 and 0x00041400, although we can’t quite make sense of it yet. At 0x00200000 we can also see meta, followed by an XML plist at 0x00200200. Maybe we were wrong about field30 being the virtual disk size?
There are a little too many variables and not enough clear structure to continue with just eyeballing hexdumps alone, so let’s look for a binary to reverse.
Looking for our binary
There are a few ways we can go about looking for our binary, but since I wasn’t in any particular hurry I took a pretty lazy approach:
❯ grep -r "ASIF" /System/Library/Frameworks /System/Library/PrivateFrameworks
[...]
Binary file /System/Library/PrivateFrameworks/DiskImages2.framework/Versions/A/XPCServices/diskimagescontroller.xpc/Contents/MacOS/diskimagescontroller matches
[...]
Research note
I often use YARA for this purpose instead of grep, which is usually a bit faster, but this will do for now.
Out of our matches, diskimagescontroller jumps out the most, and running strings on it reveals a lot of ASIF related content, including very valuable log messages, mangled function signatures and type names!
❯ strings diskimagescontroller | grep -i "asif"
[...]
N7di_asif7details3dirE
N7di_asif7details8dir_baseE
[...]
Invalid value for asif header field: %s
Size cannot exceed max ASIF size
Unexpected ASIF header length (
[...]
asif_header
Couldn't read asif's header
[...]
Let’s throw this puppy into IDA!
What’s in the header
The first stop of reverse engineering anything is to look for references to interesting looking strings, and this time is no exception. For a file format, it makes sense to first focus on how to interpret the file’s header, and then go from there. We already saw some interesting strings related to “asif’s header” with the strings command, so let’s just look at some of the functions that reference those strings.
Research note
At the time I did this research, I went searching online for some of the symbol names I encountered. From this I learned that there are projects on GitHub were people diff iOS firmware updates, but also that the iOS version of the same binary might contain some more symbols/strings. I ended up reverse engineering the iOS version of this binary, but not necessarily for this reason.
If there are both x86 and ARM variants of the same binary, I like to have them open simultaneously. The decompiler output of one version can sometimes be much clearer than the other. I have no real data to back this up, but my gut feeling is because of the varying levels of compiler, but also decompiler optimizations for both architectures. Regardless, I remember the version of IDA I was using would crash randomly on the x86 variant of the binary, so I just spent most of my time annotating the iOS version, even though I don’t think there were actually any meaningful differences between the two.
Anyway, I’m rambling, let’s continue!
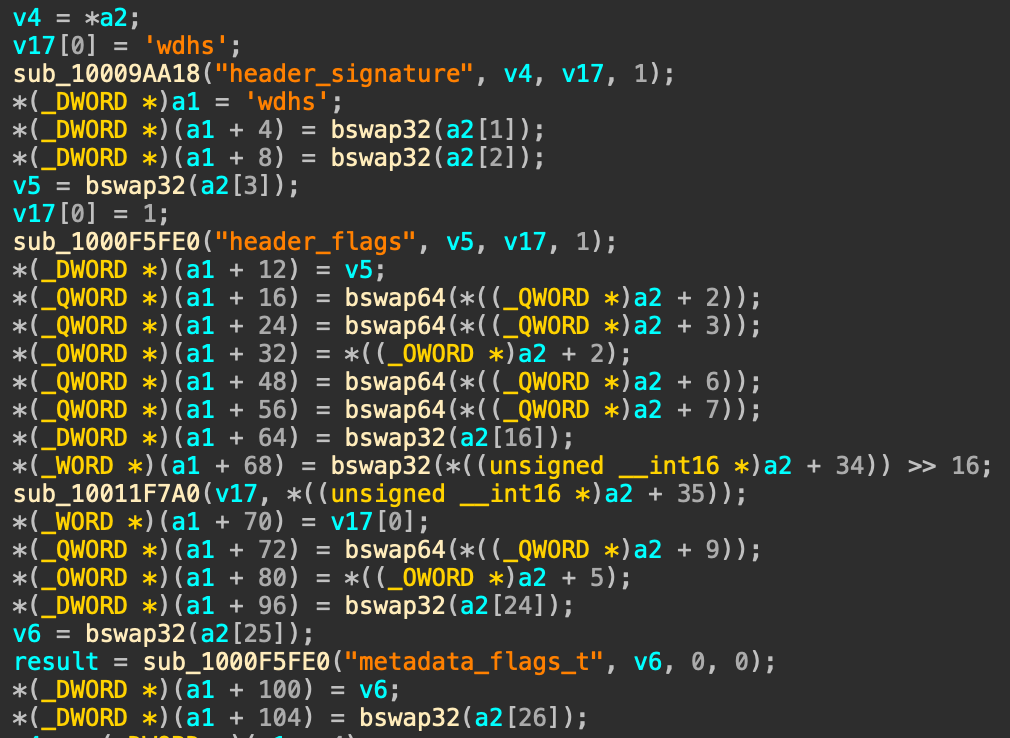
Figure 1: This looks like it parsed an ASIF header
We can very quickly find a function that looks like it parses values out of a raw ASIF header (a2) and storing it into an in-memory structure (a1), see Figure 1. A little lower in this function (not pictured), there are some simple checks against a bunch of these fields, paired with some helpful error/log messages ("ASIF max_write size in header exceed the limit", "Sector count is too large", etc).
We immediately learn a lot:
- The offset and byte length of each field in the header;
- The name or purpose of some of these fields.
If we update our header definition from before, and add just a pinch of draw-the-rest-of-the-fucking-owl, we end up with something like this:
struct asif_header {
    uint32 header_signature;
    uint32 header_version;
    uint32 header_size;
    uint32 header_flags;
    uint64 directory_offsets[2];
    char guid[16];
    uint64 sector_count;
    uint64 max_sector_count;
    uint32 chunk_size;
    uint16 block_size;
    uint16 total_segments;
    uint64 metadata_chunk;
    char unk_50[16];
    uint32 read_only_flags;
    uint32 metadata_flags;
    uint32 metadata_read_only_flags;
};
Looks like we guessed a few fields correctly in our previous attempt!
Make it make sense
If you’re thinking “that’s a very liberal pinch of owl”, you’d be correct. I glossed over some details, but it’s not super interesting how I came to those.
At this stage, the reverse engineering process of various functions in diskimagescontroller simply has a very high owl-factor. It’s a relatively straightforward binary to reverse engineer, which in turn makes ASIF relatively straightforward to reverse engineer. The only “annoying” part is the liberal amount of dynamic dispatching, so there’s some inheritance and virtual function tables to deal with, but for the most part they aren’t that complex. It doesn’t make for great blog content.
Anyyhoooww, here are some of the important bits:
- The header has a field
directory_offsets, which is a byte offset to a sort of allocation directory;- Each directory starts with a
uint64version, and the directory with the highest version is the current active directory. This allows for atomic updates.
- Each directory starts with a
- Each directory has a list of tables, and each table has a list of
uint64“data entries”. - Data entries are grouped by a certain ratio, and each group is followed by a “map entry”, which is a bitmap for the preceding groups.
- Each data entry points to a chunk of data in the ASIF file.
- The chunk size is defined in the header and is typically 1 MiB.
- Data entries have 55 bits usable for the chunk number and 9 bits reserved for flags.
- The maximum virtual disk size seems to be just under 4 PiB, with a small portion at the end reserved for metadata.
- The actual size of the virtual disk is defined in the header, as well as the maximum size the disk can grow to.
- The header contains the offset to a metadata block, which is typically
(4 PiB - 1 chunk), meaning it’s within the reserved area.- The metadata block contains a small header and a plist, which should contain a
internal metadataanduser metadatadictionary.
- The metadata block contains a small header and a plist, which should contain a
The bit format for data entries is as follows:
0b00000000 01111111 [...] 11111111 11111111  (chunk number)
0b00111111 10000000 [...] 00000000 00000000  (reserved)
0b11000000 00000000 [...] 00000000 00000000  (flags)
With the currently known flags (derived from strings from the binary):
0b00  (uninitialized)
0b01  (fully initialized)
0b10  (unmapped)
0b11  (has bitmap)
If you’ve ever looked at how other sparse disk formats (VMDK, VHDX, QCOW2) work, you’d find that ASIF is a quite elegant and simple format. Sure, it doesn’t have all the same features, but at least the basic stuff is pretty simple to reason about.
Adding all of this information to our implementation is fairly uneventful. Read some fields from the header, verify them, seek to some offsets, bob’s your uncle. There’s one major detail we glossed over though.
We didn’t cover how to go from an arbitrary offset inside of the virtual disk to a chunk in the ASIF file.
Research note
Quick refresh on virtual disk formats like ASIF and all the other four-letter-acronyms I’ve mentioned so far. They all function on one simple principle: storing a large disk, or file, in a smaller, “sparse” manner. The disk is chopped up into smaller pieces, and some kind of mechanism inside the file format is responsible for keeping track whether a given piece is allocated (present) or not (missing), and where in the file to find that piece.
So, to read any given offset “inside” the virtual disk, we need to figure out this mechanism, or algorithm.
If you take what we know (a directory with some amount of tables and some other amount of entries per table), accessing a chunk becomes tables[X][Y]. We just have to figure out how to calculate X and Y for any given offset. Most sparse file formats work in this way, with various different names for “directory” or “table”.
This was the part that was the most annoying to reverse engineer, because a lot of the math for this was divided over several functions, and a lot of the pseudocode looked like it was a bunch of stacked macros, halfway optimized into something that barely made sense. Initially I copy pasted the pseudocode IDA generated, whipped up some plausible sounding variables names with an LLM and called it a day. It looked something like this:
blocks_per_chunk = chunk_size // block_size

reserved_size = 4 * chunk_size
num_reserved_table_entries = (
    1 if reserved_size < blocks_per_chunk else reserved_size // blocks_per_chunk
)

max_table_entries = chunk_size >> 3
num_table_entries = max_table_entries - (
    max_table_entries % (num_reserved_table_entries + 1)
)
num_reserved_directory_entries = (num_reserved_table_entries + num_table_entries) // (
    num_reserved_table_entries + 1
)
num_usable_entries = num_table_entries - num_reserved_directory_entries
# This is the size in bytes of data covered by a single table
size_per_table = num_usable_entries * chunk_size

max_size = block_size * header.max_sector_count
num_directory_entries = (size_per_table + max_size - 1) // size_per_table
And to read a chunk from the ASIF file for a given offset:
table = directory.table(offset // size_per_table)

# Calculate the relative chunk index within the table
relative_block_index = (offset // block_size) - (table.virtual_offset // block_size)
entry_index = (
    relative_block_index // blocks_per_chunk
    + relative_block_index // blocks_per_chunk * num_reserved_table_entries
) // num_reserved_table_entries
Very little attempt at actually understanding this, as evident by the lack of comments. It gave me the correct number, I was happy and had other things to do.
Revisiting the topic for this blog made me take another look.
An unexpected second wind
When I first started writing this blog post in November of 2025 (yes, I know, and to make it even worse, I had done all the reverse engineering in July of that year), I stumbled upon a Reddit post and subsequent GitHub repository from huven. Independently from my own endeavor, huven had started to document the ASIF file format. We exchanged some ideas, and then I just did other stuff until June of 2026, the time of this writing and hopefully the time of publishing haha.
I wasn’t satisfied with my understanding on how reading from an ASIF file works and I didn’t want to half-ass this post, so I looked up huven’s work again and started refining my implementation. The names I originally went with were along the lines of “usable entries” and “reserved entries”, and the math was hard to reason about but did calculate the correct values.
In our exchanges, huven had mentioned something about bitmaps, something that I had originally completely ignored as they weren’t important for my read-only implementation. His repository describes that chunk entries are grouped into “chunk groups” and are followed by a bitmap. He also describes the format of the bitmap itself. With this in mind, I took a fresh look at the math as I took it from the assembly, and I could finally make sense out of it. Going back to my IDA database, it even looks like I originally took notice of the bitmaps and groups, as I named a lot of variables with “group” nomenclature. I guess I should’ve persisted with my artisan approach at the time.
You may be thinking “but you just mentioned bitmaps and chunk groups in the previous section where you explain the important bits”. Yes I retconned the post. Sue me.
How reading actually works
I almost sound like an LLM with that title. Anyway, let’s go step by step on how to go from an arbitrary offset to the correct ASIF chunk. The math for this is still based primarily around the math from diskimagescontroller. For an alternative explanation, you can check out huven’s repository.
Let’s begin with taking a slice of an ASIF file that contains all the interesting bits we need.
Between 0x00400000 and 0x00404000 (the first table, directory not pictured) we can see three populated entries. If we ignore the flag bits, these are entries for chunks 5, 6 and 7. With a chunk size of 0x100000, we can see data in chunks 5 and 6, and some students from Utrecht repeated 0x55 in chunk 7, which happens to be 0b01 repeated. Based on this we can learn a few things:
- There are
(0x00404000 - 0x00400000) // 8 = 2048chunk entries before a bitmap - The bitmap uses 2 bits per block
- A single byte in the bitmap thus covers 4 blocks
- The bitmap is 1 chunk in size, so a full bitmap covers
4 * chunk_sizeblocks - The bitmap covers one chunk group, so the number of blocks per chunk group is equal to the bitmap coverage
- Blocks are marked as allocated in groups of 32 at a time
This matches what huven already documented.
If we combine this with the earlier math from diskimagescontroller and apply our newfound knowledge, we get the following:
blocks_per_chunk = chunk_size // block_size

# Based on the observations above
num_blocks_per_group = 4 * chunk_size

# We need at least one chunk in the group
num_chunks_per_group = max(1, num_blocks_per_group // blocks_per_chunk)

# This is the maximum amount of raw entries (uint64) a table could hold
num_words_per_chunk = chunk_size // 8

# A chunk group has one entry for each chunk, plus one entry for the bitmap
num_entries_per_group = num_chunks_per_group + 1

num_groups_per_table, num_remaining = divmod(num_words_per_chunk, num_entries_per_group)
# The number of total entries in a table, including both chunk and bitmap entries
num_table_entries = num_words_per_chunk - num_remaining

# Calculate the size in bytes of data covered by a single table
num_chunk_entries_per_table = num_table_entries - num_groups_per_table
size_per_table = num_chunk_entries_per_table * chunk_size

# Calculate the maximum size of the virtual disk
max_size = block_size * header.max_sector_count
# And the number of tables needed to cover that size
num_tables = (size_per_table + max_size - 1) // size_per_table
Then, if we want to go from a given offset (again, assuming that reads will be aligned to the chunk size), the logic becomes this:
table = directory.table(offset // size_per_table)

# Calculate the relative chunk index within the table
relative_block_index = (offset // block_size) - (table.virtual_offset // block_size)
relative_chunk_index = relative_block_index // blocks_per_chunk

# Calculate the chunk group
chunk_group = relative_chunk_index // num_chunks_per_group
# Each chunk group has a bitmap entry, so we need to account for that in the entry index
entry_index = relative_chunk_index + chunk_group
I don’t know about you, but that seems a whole lot easier to understand and follow! The file format also “clicked” for me now, especially when looking at the hexdump. Previously I had just accepted that it gave me the correct values.
Accounting for the “skipping” of a few entries in the table might still look a little bit confusing. Most other sparse disk formats choose to store their allocation bitmaps somewhere else entirely, if they even have one to begin with (the table entries themselves also record “allocation status”, in a way). I guess Apple really wanted to have allocation bitmaps in ASIF, didn’t want to introduce a separate mechanism, and just went “now kiss” with the existing tables. It’s elegant, in a way, I suppose. It just made reverse engineering initially a little bit more confusing when you aren’t aware of them yet.
Wrapping up
The entire implementation is made available as part of dissect.hypervisor (specifically asif.py and c_asif.py). The final fixups are currently still awaiting review in a pull request. It’s also all wired up into Dissect, so you can run all the Dissect tools and APIs against any ASIF file:
❯ xxd ED213FEE-7B2F-410F-A7C3-C5976EBF7903.img | head -1
00000000: 7368 6477 0000 0001 0000 0200 0000 0000  shdw............

❯ target-info ED213FEE-7B2F-410F-A7C3-C5976EBF7903.img
<Target ED213FEE-7B2F-410F-A7C3-C5976EBF7903.img>

Disks
- <Disk type='asif' size=68719476736>

Volumes
- <Volume name='iBootSystemContainer' size=524287488 fs='apfs-container'>
- <Volume name='Container' size=62826479104 fs='apfs-container'>
- <Volume name='RecoveryOSContainer' size=5368667648 fs='apfs-container'>

Mounts
[...]

Hostname       : users-Virtual-Machine
Domain         : None
Ips            : 192.168.64.2
Os family      : macos
Os version     : macOS 26.4.1 (25E253)
Architecture   : aarch64-apple-macos
Language       :
Timezone       : America/Los_Angeles
Install date   : None
Last activity  : 2026-06-11T08:23:41.690898+00:00